

Most people can handle treadmill assembly at home with a helper and the tools in the box. Set the base where it will live, fit the uprights with the wires fed through first, attach the console, then level the frame and set the belt tension before the first walk.
Treadmill assembly is a two-person job that most people can finish at home with the tools in the box. The motor, deck and belt usually come built; you fit the uprights, the console and the covers, connect a few cables, then level the frame and set the belt. In my view, the steps are simple; the trouble comes from pinched wires, bolts tightened too early and too little room behind the machine.
Know what you are working with before you open the box. The parts list, the tool list and the clearance figures in your manual decide how the day goes, and a solid setup protects the machine, your floor and everyone in the room.
Understanding Treadmill Parts Before Assembly
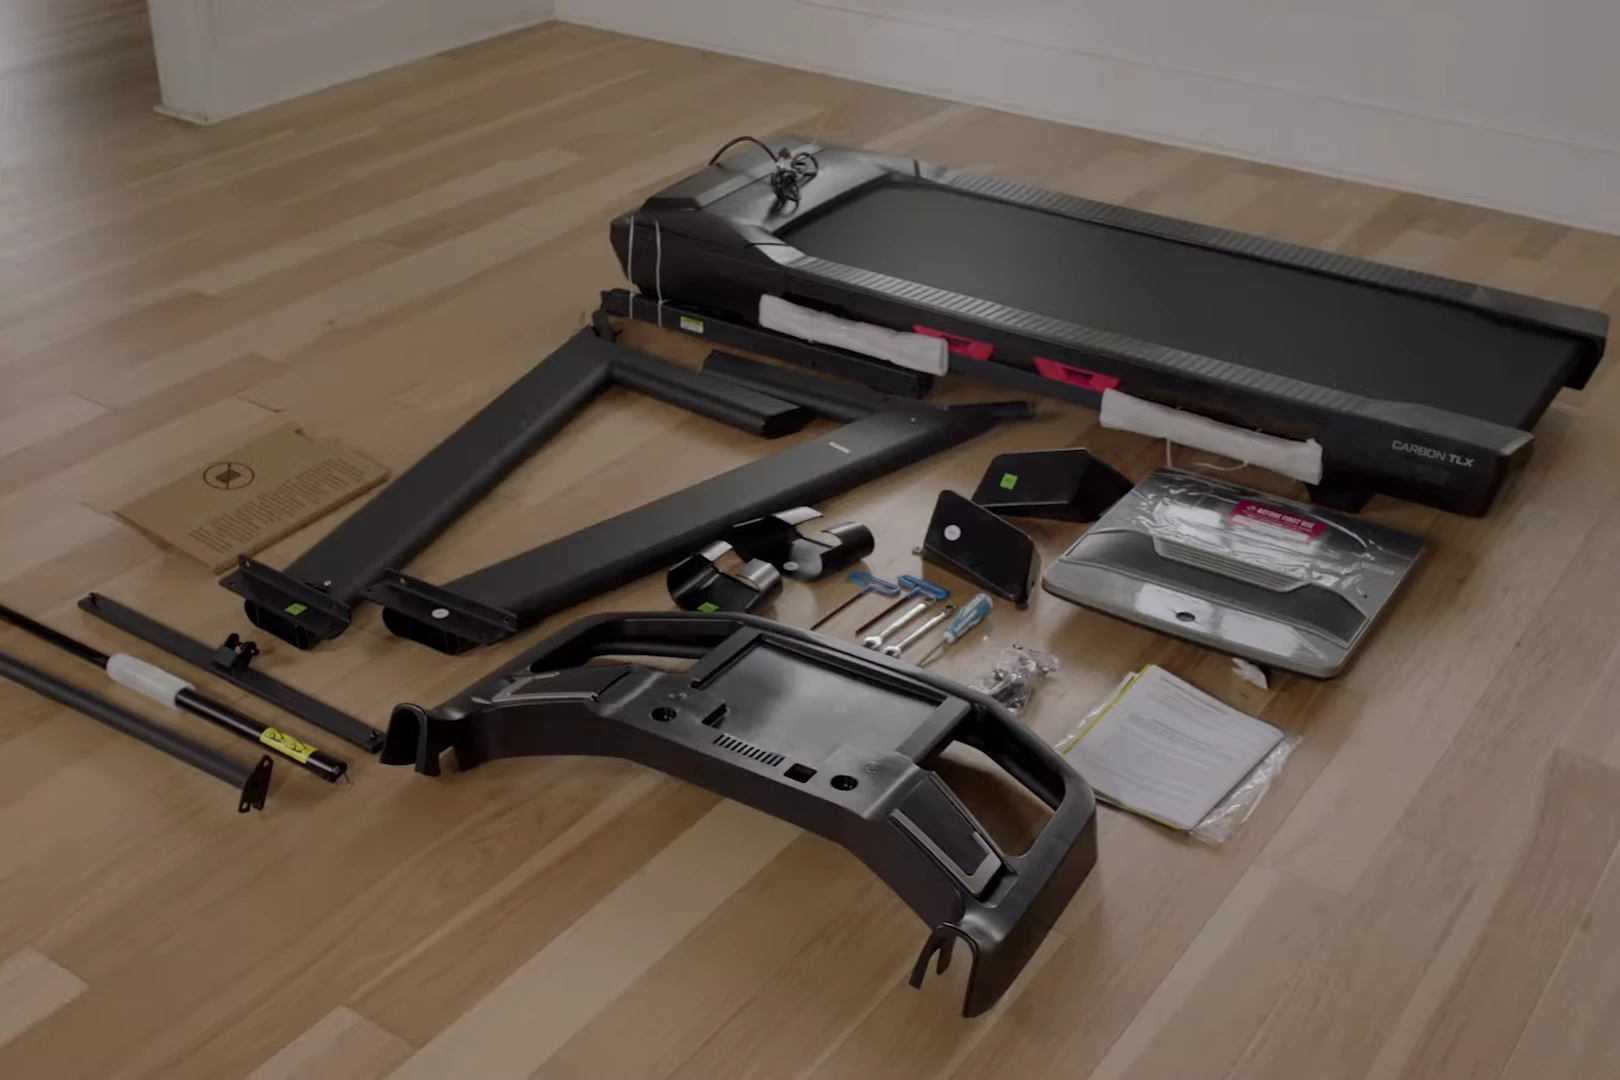
Knowing the parts makes assembly faster. Check every bag against the parts list before you start.
Main structural components:
Frame - The foundation supporting everything, typically constructed from steel or aluminum
Deck - The platform beneath the belt that absorbs impact from your footstrike
Running belt - The surface you walk or run on
Rollers - Front and rear cylinders that keep the belt moving smoothly
Console - Your command center displaying speed, distance, and workout metrics
Mechanical components:
Drive motor - Powers the belt on motorized models
Drive belt - Connects the motor to the front roller
Incline motor - Adjusts the deck angle for hill simulation
The incline motor adds hill work, and it also adds weight and wiring to the base you carry in. If you have not yet purchased your machine and incline training is a priority for you, our best incline treadmill for home use guide covers the top models worth considering before you commit.
Electrical components:
Console display - LCD or LED screen showing workout data
Control board - The brain coordinating all electronic functions
Safety key - Emergency stop mechanism that halts the belt immediately
Essential Tools and Space Requirements
Never start treadmill assembly without checking the tool list first. The NordicTrack Commercial 1750 (model NTL14122.2, the 2021 US edition) needs the included hex keys, one Phillips screwdriver and one adjustable wrench, and neither it nor the ProForm PRO 2000 should be assembled with power tools, because they can damage parts (1, 2).
Tools to have ready:
Phillips head screwdriver
Allen wrench set (often included)
Adjustable wrench
Utility knife for the straps and packaging
Measuring tape
Level
Space considerations:
Your treadmill needs a clear zone behind it, because a fall from a moving belt goes backwards. The NordicTrack Commercial 1750 needs at least 8 ft (2.4 m) behind the machine and 2 ft (0.6 m) on each side (1). Sole sets at least 3 1/2 ft behind the F80 (3), and the European-edition Horizon T202 a zone at least 79 in (2 m) long (4). I'd plan for the largest of these, because that space suits every model.
Assemble in the room where the treadmill will live. Unpack and assemble the Horizon T202 where it will be used, and do not lift or move it until it is fully assembled and folded with the latch secure (4). Measure doorways, hallways and stairs before delivery, and measure the ceiling in that room as well.
Non-folding models with tall frames are the hardest to bring through a house. If space is a concern and you have not finalized your purchase yet, our folding treadmill review and comparison covers compact models specifically designed to minimize footprint without compromising belt length or structural stability.
Choose a flat, level spot in a temperature-controlled room. Horizon rules out garages, covered patios and outdoor spaces for the T202 (4), and Sole warns against deeply padded or shag carpet (3). Most treadmills have adjustable leveling feet for small floor irregularities.
How to Assemble a Treadmill: Step-by-Step Process
Treadmill assembly follows the same order on most home models: base, uprights, handrails, console, then checks. Across the NordicTrack, ProForm, Sole and Horizon models I compared, only the hardware sizes and the cable layout change. Here is how to assemble treadmill parts in that order.
If you are still deciding which model to bring home, our guide to the best treadmill for home breaks down the top options based on assembly friendliness, motor reliability, and long-term value.
- STEP 1Unbox and check Lay out every part and match it to the parts list.
- STEP 2Place the base Set it flat where the treadmill will live.
- STEP 3Fit the uprights Feed the wire first, then start the bolts loosely.
- STEP 4Connect the console Match the keyed plugs, then bolt it level.
- STEP 5Tighten and tension Tighten every bolt, level the feet, set the belt.
Step 1: Unbox and inventory
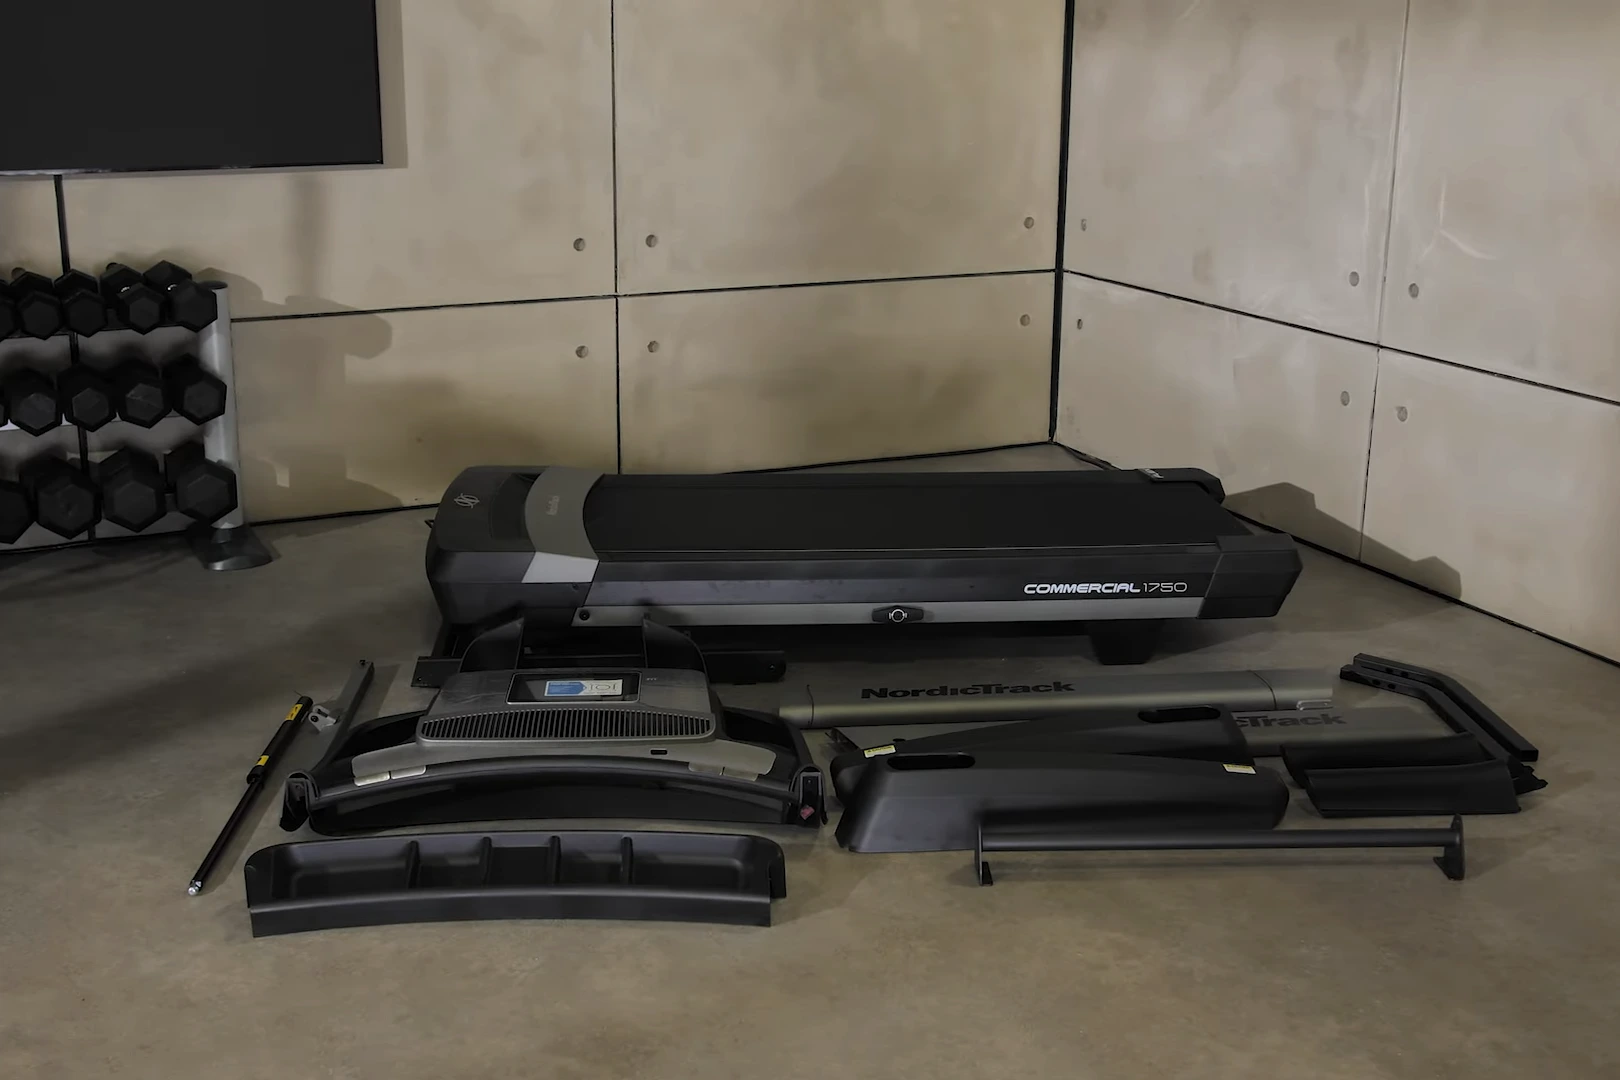
Carefully cut the packaging and lay out all components on a clean surface. Check parts against the assembly manual. If anything's missing or damaged, contact the manufacturer immediately before attempting assembly.
Most packaging includes plastic protective covers on decals and frames. Remove these before starting assembly to avoid having them interfere with bolt holes or wire connections.
Step 2: Position the base frame
Place the base on the spot you chose, with the deck flat. Keep a folding model flat while you cut the shipping strap: tilting the Sole F80 sideways after the strap is off can make it fold and spring upwards (3).
Recruit a helper for this stage. Assembly is a two-person job on the NordicTrack Commercial 1750 and the ProForm PRO 2000 (1, 2), and a home treadmill is heavy: the complete Horizon T202 weighs 192 lb (87 kg) in its European edition (4).
Step 3: Attach the uprights
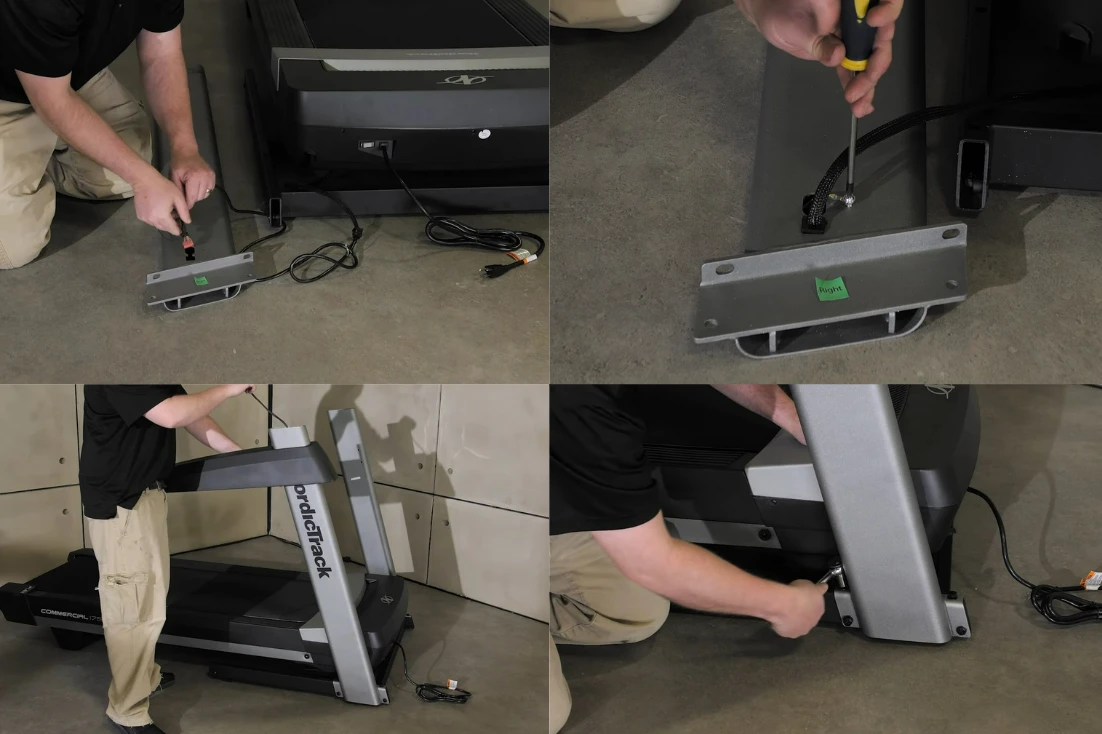
This step requires precision. The uprights carry the wiring that connects the console to the motor controller. On the Commercial 1750 and the ProForm PRO 2000 the wire runs through the right upright only, so a second person holds that upright against the base while you feed the wire (1, 2).
Critical wire management: Feed wiring through its channel before you secure any bolt. A wire pinched inside a steel tube can stop the console from working. Before the final tightening, look down each upright and confirm the cable runs free.
Start every bolt by hand and leave it loose until the step says to tighten. Sole has you fit the upright bolts loosely and tighten everything from steps 2 to 4 only after assembly is complete (3). Then tighten gradually, working across the frame, so the uprights pull in square.
Step 4: Connect the console
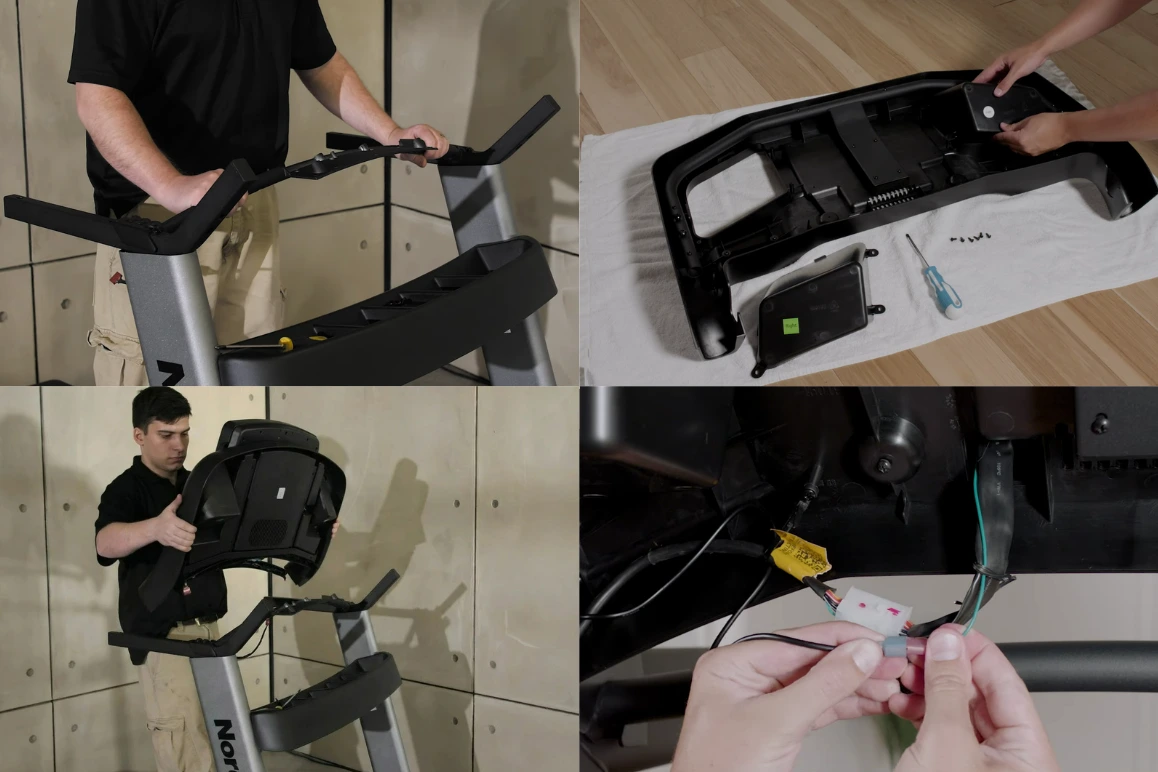
Most modern treadmills use color-coded or keyed connectors that prevent incorrect wiring. Match connector shapes carefully because forcing mismatched connectors damages circuit boards.
The console bolts to the uprights or the handrails. Make sure it sits level and secure before you tighten completely, because a loose console rattles during workouts.
Step 5: Final checks and calibration
Before plugging in, verify:
All bolts tightened securely
No wires pinched or exposed
Safety key properly seated
Belt centered and tensioned correctly
To check belt tension on the two iFIT models, lift each edge of the belt near the foot rail: a correctly tightened belt lifts 2 to 3 in (5 to 7 cm) off the deck (1, 2). Adjust the rear roller bolts a quarter turn at a time and turn both sides evenly, or the belt will drift to one side (3).
Store the safety key out of reach of children once you finish. CPSC advises that a treadmill not in use is unplugged and its safety key kept away from the machine and out of children's reach (5).
Treadmill Assembly Time: What to Expect
Assembly time depends far more on the model than on your skill. A folding model with pre-fitted uprights goes together quickly, while a heavy non-folding model with a touchscreen takes the longest. Plan an unhurried afternoon with a helper rather than a fixed number of minutes.
Assembly time by treadmill type:
| Treadmill Category | Assembly Time | Complexity Level |
|---|---|---|
| Basic folding treadmill | Short: uprights and console only | Low |
| Mid-range home treadmill | Longer: more cables and covers | Medium |
| Premium/commercial model | Longest: heavy parts and a screen | High |
| Manual treadmill | Short: no wiring at all | Low |
Factors affecting assembly duration:
Your first treadmill assembly takes longer than any later one, because most of the time goes into reading each step and finding the right bolt.
Helper availability speeds things up. The upright stage alone justifies a second person: one holds the upright while the other feeds the wire and starts the bolts.
Treadmill Assembly Service vs DIY
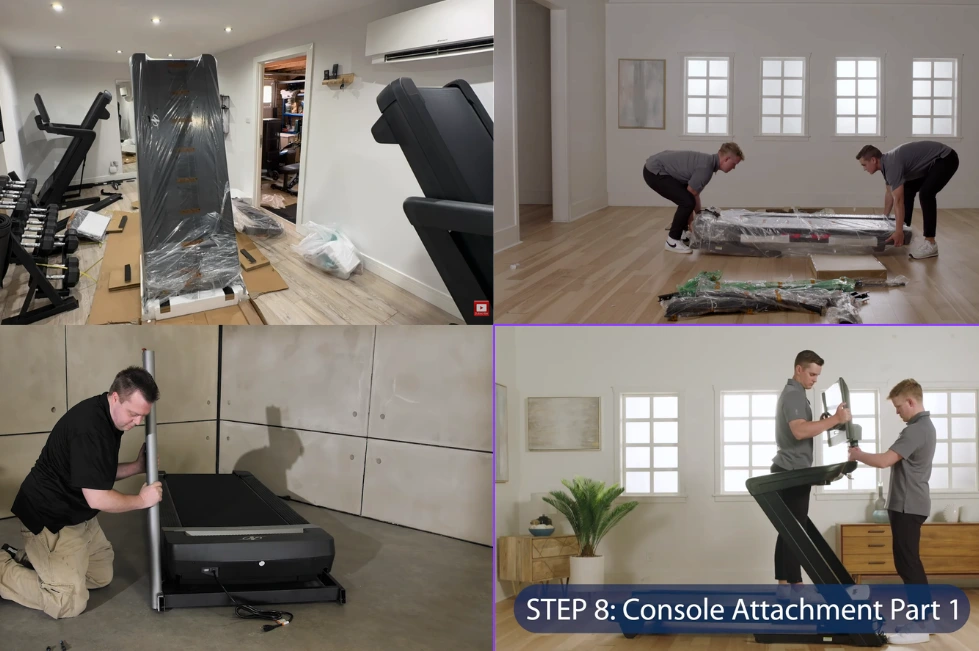
Should you hire professionals or handle treadmill installation yourself? Each approach has clear advantages, and the right one depends on the machine's weight, your helper and your schedule.
DIY assembly benefits:
No assembly fee to pay
Familiarity with your equipment's inner workings
Flexibility in scheduling
The saving alone makes DIY worth it for many people. If you're mechanically inclined and have a helper available, put that money toward a good mat or a surge suppressor.
When to hire a treadmill assembly service:
Professional assembly makes sense for heavy commercial-grade machines, limited physical capability, or time constraints. Services typically include:
Complete unboxing and assembly
Debris removal
Placement in your chosen room
Initial calibration and testing
A correct belt setup, which matters for cover: on the Sole F80, belt damage from wrong tension or tracking adjustment is not covered by the warranty (3)
Professional installers know the quirks of different brands, which prevents common mistakes. A large machine such as the NordicTrack Commercial 1750 is where that help pays off most, because the uprights, handrails and console each need two people (1).
Treadmill assembly service levels:
| Service Level | Best For | What's Included |
|---|---|---|
| Basic assembly | Light folding models | Standard setup, no debris removal |
| Standard service | Most home treadmills | Complete assembly, packaging, and disposal |
| Premium installation | Heavy or upstairs installs | White glove service, placement, and calibration |
The treadmill installation cost varies by region, provider and machine. Ask for a quote that names the model, the floor it goes on and whether stairs are involved.
Some retailers include assembly with delivery, so compare total costs. Always calculate the total out-of-door price, including treadmill setup and delivery, when comparing treadmill deals.
Assembly Instructions and Resources
Your treadmill manual provides model-specific guidance, but manufacturers now offer additional resources that simplify assembly dramatically.
Modern assembly support:
Video tutorials - Many makers publish assembly videos; match the model number on your frame label before you follow one
Parts charts - The manual's hardware chart helps you tell similar bolts apart before you fit them
Product registration - Registering the machine activates the warranty on the NordicTrack Commercial 1750 (1)
Maker support - Call the maker's support line if a part is missing or damaged
Watch the assembly video for your model before you start. Seeing the process reveals details that written treadmill assembly instructions miss.
If you have lost the paper manual, download it from the maker's support site using the model number on the frame label. Assembling a treadmill without instructions is a gamble, because bolt lengths differ between steps and a long bolt in the wrong hole can damage the frame.
Common Assembly Challenges and Solutions
Challenge 1: Misaligned bolt holes
Sometimes, upright holes don't perfectly align with base holes. Don't force bolts through misalignment. This strips threads and compromises structural integrity. Instead, loosen all bolts slightly, adjust alignment, then retighten systematically.
Challenge 2: Cable connection confusion
Modern treadmills have several wire connections between the base and the console. Take a photo of each connector before you join or separate anything, so you have a record if a diagram is unclear.
Forcing a plug that does not fit. Keyed connectors go in one way only, and a forced plug can damage the circuit board.
Challenge 3: Belt tracking issues
A belt that keeps drifting to one side needs a tracking adjustment. Turn the tracking bolt a quarter turn at a time and wait a few minutes after each turn, because a small adjustment can make a large difference that does not show right away (3).
Challenge 4: Unstable frame
If your assembled treadmill wobbles, check these areas first:
Floor levelness (use adjustable feet)
All bolts fully tightened
Weight evenly distributed on stabilizer feet
No packaging materials stuck under the frame
Manual Treadmill Assembly Differences
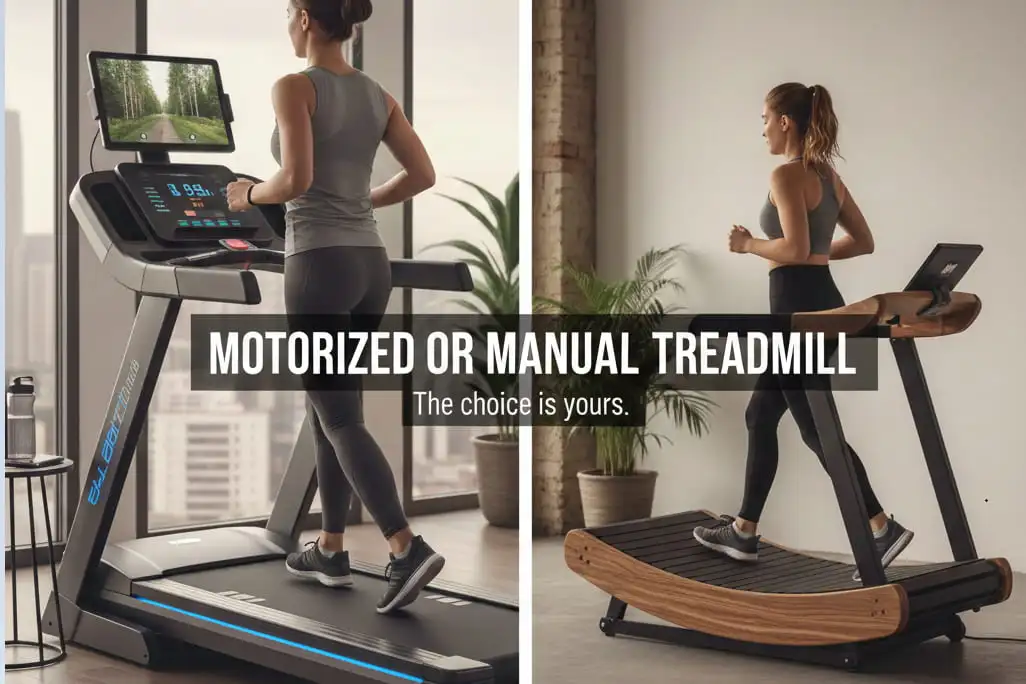
Non-motorized treadmill assembly typically proves simpler than motorized models. Without drive motors, control boards, and electronic incline systems, manual treadmills have fewer components and connection points.
Unique manual treadmill considerations:
Manual walking treadmills focus on simplicity and usually need only the handlebars fitted and a final adjustment.
If you are drawn to the simplicity of a non-motorized walking machine but want a model specifically built for desk use, our under desk treadmill review and comparison covers the top walking pads that arrive almost fully assembled and fit neatly under a standing desk with minimal setup required.
The biggest manual treadmill assembly advantage is that there are no electrical connections to worry about. This eliminates the most common source of DIY assembly frustration.
Belt tension matters more on manual treadmills, since your stride alone drives the belt. It should move freely without going slack under your foot.
Best Treadmill for Home Use Assembly Considerations
Before you commit, the treadmills we cover are laid out side by side so you can compare before buying.
Once your machine is set up, the guide on running on a treadmill correctly covers form, speed progression, and safety tips for getting started.
What makes an easy assemble treadmill:
Wiring in one upright only, as on the NordicTrack Commercial 1750 and ProForm PRO 2000
Left and right parts marked L and R
Every tool you need included in the box
A folding frame with fewer separate parts
More complex assemblies:
Commercial-grade units
Premium touchscreen models
Heavy non-folding treadmills
What to Put Underneath a Treadmill
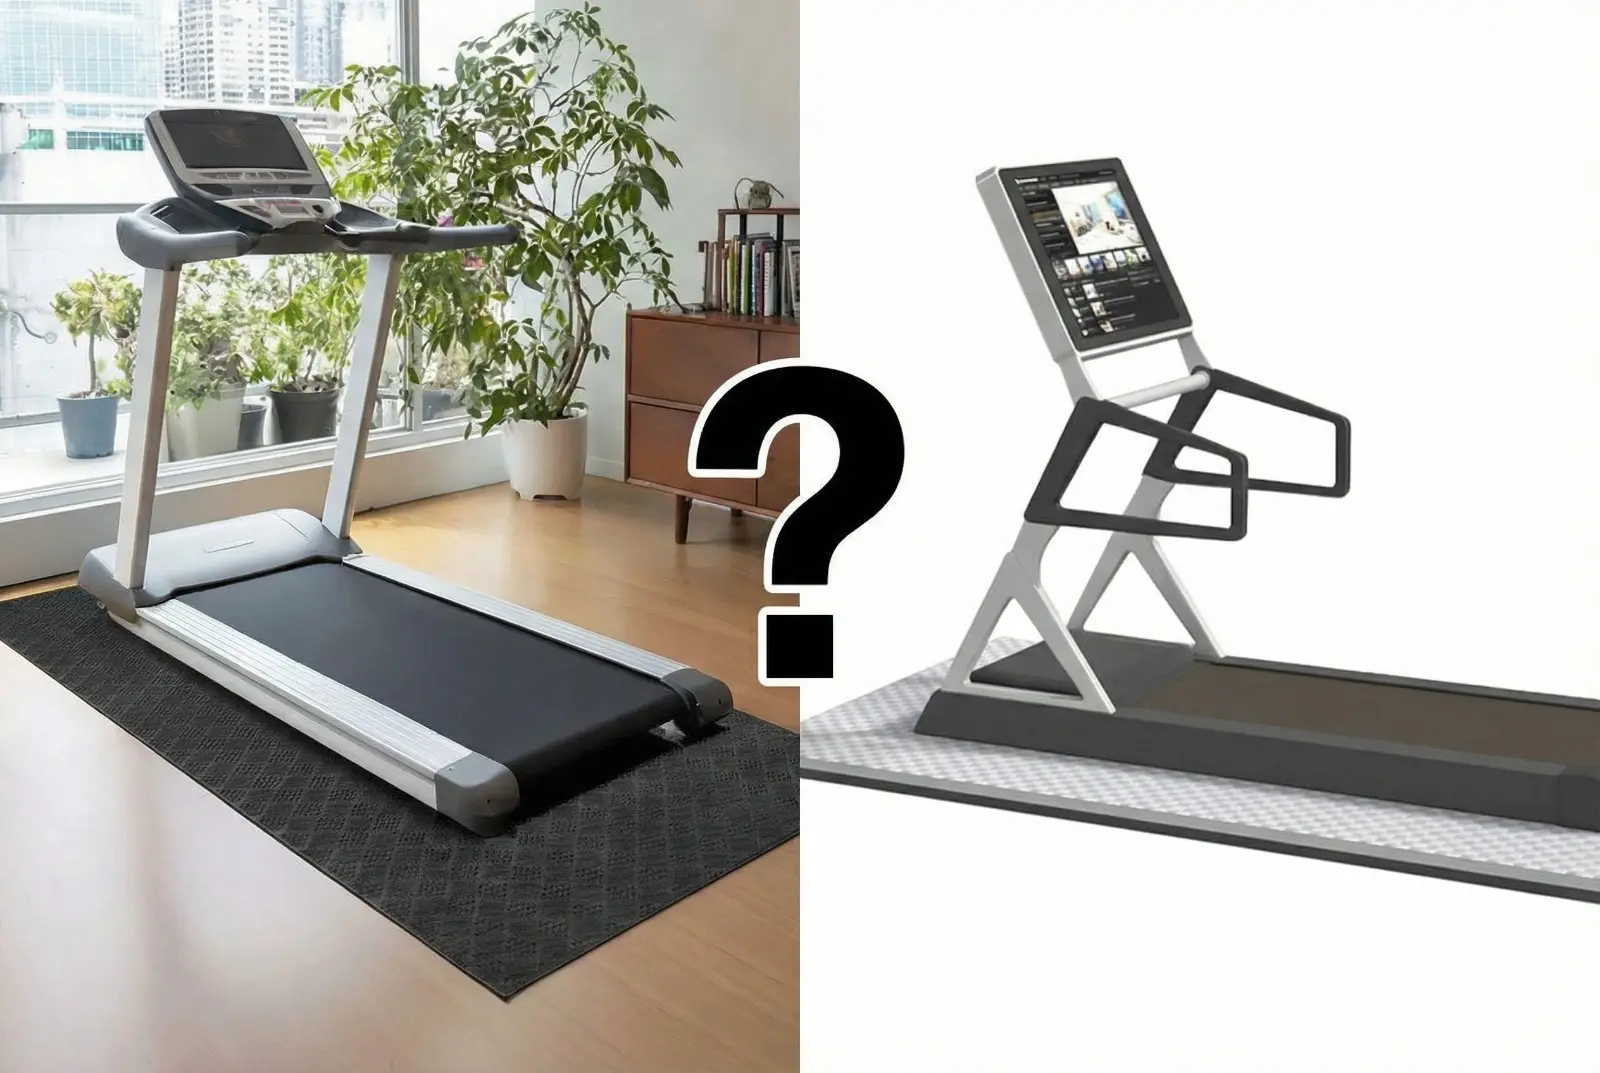
Proper treadmill mats protect both your equipment and your floor while reducing noise. A mat under the treadmill protects the floor or carpet (1), and in my view a mat belongs on the shopping list rather than the optional list.
Treadmill mat benefits:
Floor protection - Prevents dents and scratches from heavy equipment
Noise reduction - Absorbs vibration that would otherwise travel through floors to rooms below
Belt cleanliness - Prevents dust and carpet fibers from entering the treadmill mechanism
Mat material comparison:
| Material | Thickness | Best For | Watch For |
|---|---|---|---|
| PVC | Thin | Light treadmills, budget option | Can slide on smooth floors |
| Rubber | Thick | Heavy equipment, best noise reduction | Heavy to move and trim |
| EVA foam | Thin to medium | Portable/folding treadmills | Can dent under heavy frames |
On carpet, use a firm, dense mat, or a board under a standard mat, so the frame sits stable. Avoid deep or shag carpet entirely, because it can damage both the carpet and the treadmill (3).
Concrete and hardwood floors benefit from a rubber mat. The harder your flooring, the more a mat matters for noise.
Choose a mat larger than the treadmill's footprint on all sides, so it catches sweat and keeps dust away from the belt.
Treadmill Setup and Placement Strategy
Strategic treadmill placement maximizes safety, function and service life. These points decide the best treadmill setup in a home.
Optimal placement considerations:
Electrical access - Place it near a grounded outlet. Sole asks for a 120 V, 15 A grounded outlet with only the treadmill plugged into the circuit, and no extension cord unless it is 14 AWG or heavier with a single outlet (3). The NordicTrack Commercial 1750 also needs a surge suppressor (1).
Ventilation - Never block the air openings, and keep them clear of lint and hair (4).
Ceiling height - Measure from the deck at its highest incline to the ceiling, and leave room above your head for the bounce of a running stride. Check this before you buy a tall non-folding model.
Natural light and entertainment - Placing your treadmill near a window or facing a TV makes workouts more enjoyable. In one trial of 30 runners, nature scenes raised happiness more than self-selected entertainment, while entertainment led to longer runs (6).
Climate control - Keep the treadmill in a temperature-controlled room. Horizon says a T202 that has been in the cold should warm to room temperature before its first use (4), and a folded NordicTrack Commercial 1750 should not stay in temperatures above 85°F (30°C) (1).
Post-Assembly Maintenance and Break-In
Your treadmill needs a short break-in and regular maintenance. On the Horizon T202 you lubricate the deck before the first use (4), while the Sole F80 belt and deck arrive pre-lubricated (3), so check which applies to your model.
Once your break-in period is complete, the next step is building a structured routine. Our treadmill workout in a gym guide covers beginner through advanced protocols, including interval training, incline progressions, and recovery sessions that take full advantage of your newly assembled machine.
First weeks of use:
Start at easy walking speeds while the belt beds in
Avoid maximum incline settings initially
Check belt tracking after the first few workouts
Expect a thumping sound and some belt dust at first; both are normal on a new belt (3)
Essential maintenance schedule:
Weekly - Wipe down belt and console, check for loose bolts
Monthly - Vacuum beneath the treadmill, inspect belt tracking, test the safety key
Every 90 hours or 90 days - Lubricate the deck on the Sole F80 (3); follow your own manual's interval
Annually - Professional inspection for commercial or heavy-use situations
Lubrication matters because a dry deck raises friction between belt and deck and loads the drive motor, drive belt and motor control board (3). Use only the lubricant your maker approves: never put silicone spray on the NordicTrack Commercial 1750 belt or deck unless a service representative says so (1).
Treadmill Assembly for Special Situations
Second-Floor Installations
Weight becomes critical when placing treadmills upstairs, because the load sits on a few small feet. A mat spreads that load and reduces noise to the rooms below. For an older or springy floor, ask a builder before you place a heavy model.
Two people on the base, one at each side, and keep it close to your body. That is the cue I give clients for any heavy carry, and it matters most on stairs.
Professional movers charge extra for stairs, but their experience prevents damage to walls, railings, and the equipment itself. If you ever need to move the machine yourself, our guide to how to disassemble a treadmill walks through the full process step by step so you can break the unit down safely before attempting any staircase move.
Apartment Living
Check your building's rules and quiet hours before you buy, and put a thick rubber mat under the machine to keep noise away from neighbors.
Tight Spaces
Folding treadmills need less floor space but enough room to fold. Measure the ceiling height for the folded position and leave room to walk around the folded machine, since a folded deck can stand taller than a low doorway.
The Renestar Folding Auto Incline Treadmill is one folding model to measure against your space before you buy.
Upgrading Your Home Gym with Smart Treadmills
Modern treadmills offer connectivity and interactive features that transform home workouts. When assembling smart treadmills, additional setup steps ensure you maximize these capabilities.
The software setup comes on top of physical assembly. Budget time for account creation and updates on your installation day.
In my view, finish every mechanical check before you sign in to an app. A loose console bolt matters more than a firmware update.
If you want a full picture of what consistent treadmill training can deliver for your health over time, our guide to treadmill benefits covers the science behind cardiovascular improvements, fat loss, mental health gains, and joint health.
Making Your Home Workout Space Complete
Setting up a complete home gym involves more than assembling a treadmill, and the guide to gym equipment for small spaces shows what else fits.
If fat loss is a primary goal for your home gym setup, our treadmill weight loss in a home gym guide covers the exact speed, incline, and session frequency combinations proven to maximize calorie burn and sustain results over time.
Setting Up Your Home Fitness Success
Patience and attention to detail matter more than mechanical skill. Read the instructions through once, recruit a helper for heavy lifting, and don't rush the wire routing or the bolt tightening.
Once your setup is complete, one training variation worth adding early is covered in our guide about the benefits of walking backwards on treadmill in a gym. Backward walking is a low-impact variation you can rotate into your routine from day one.
Frequently Asked Questions
Can I assemble a treadmill myself?
Yes, most people can assemble a treadmill themselves with the tools in the box and a helper, since the larger home models are designed as a two-person job. It is not hard if you follow the steps in order, feed the wires before the bolts and leave every bolt loose until the end.
What are the parts of a treadmill?
A treadmill consists of a steel or aluminum frame, running belt, deck platform, front and rear rollers, drive motor (on motorized models), console display, control board, safety key, and support uprights. Additional components include incline motors, heart rate sensors, and entertainment systems on advanced models.
How long does it take to assemble a treadmill?
Treadmill assembly runs from a short session for a folding model with pre-fitted uprights to most of an afternoon for a heavy non-folding model with a screen. The upright and console stages take the longest, because they need two people and careful wire routing.
What to put underneath a treadmill?
Place a rubber or PVC treadmill mat underneath, larger than the machine's footprint on all sides. It protects the floor, reduces noise, keeps dust away from the belt and stops the treadmill from creeping on hard floors.
Can one person move a treadmill?
Moving an assembled treadmill alone is not safe, and the larger home models plan every move for two people. Roll it on its transport wheels with the deck folded and latched, and hire movers for stairs.
 Tech Fitness Lab
Author
Vanja Vukas
I founded Tech Fitness Lab and hold a master's degree from the Faculty of Sport and Physical Education in Novi Sad. I have competed in sport and coached clients, and my writing has appeared on Fitness Volt and BOXROX. I research products from their manuals, spec sheets and warranty terms, and I flag thin evidence.
References
- NordicTrack. Commercial 1750 Treadmill User's Manual, Model No. NTL14122.2. iFIT Health and Fitness; 2021.
- ProForm. ProForm PRO 2000 Treadmill User's Manual, Model No. PFTL12820.8. iFIT Health and Fitness; 2023.
- Sole Fitness. Sole F80 Treadmill Owner's Manual, 2026 Ver.A. Sole Fitness; 2026.
- Johnson Health Tech. Horizon T202 Treadmill Owner's Manual (EU edition). Johnson Health Tech; 2020.
- US Consumer Product Safety Commission. Peloton recalls Tread+ treadmills after one child died and more than 70 incidents reported. Published May 5, 2021.
- Yeh HP, Stone JA, Churchill SM, Brymer E, Davids K. Physical and emotional benefits of different exercise environments designed for treadmill running. Int J Environ Res Public Health. 2017;14(7):752. doi:10.3390/ijerph14070752